Thursday, July 14, 2011

Eenie Many Minnie Bows!

Munchface in her 2009 Halloween Costume

Hey there, Mouseketeers! You'll have to excuse me. I’m having one of those moments like they do on sitcoms where the character stares off into space, the screen goes blurry and you begin to hear and see a moment of the past… Well, here goes mine to put all of this craziness that is to come into perspective.
With her arms up and her hands clapping, I enjoyed the sounds of happiness squealing from my beautiful baby girl… wiggling, coo-ing, spitting, all things that instantly warmed my heart.  I turned to my hubby, who also was basking in the glory of God’s miracle that is our daughter, and said, “She just LOVES that song…”  He replied, “I know. Look at her; she’s getting it in!”  The song continued with the characters (and my munchface) dancing…
 “Hot dog, hot dog, hot diggety dog
Now we got ears, it's time for cheers!

Hot dog, hot dog, the problem's soooooooooolved
Hot dog, hot dog, hot diggety dog!”


*FLASHBACK #2* Hubby and I were watching TV one evening and a Disney commercial came on.  The children were so excited about an upcoming trip to Disney that they couldn’t sleep...well, they move to the parents’ bedroom and they were so excited that they, too, just couldn’t sleep. 


Hubby turns to me and says, “we should plan a trip to Disney; when do you think we should go?”  I reply, “she’s 2 now, which is too young... 3 and 4 she’ll be young enough to require carrying if she gets too hot… Hmmm, let’s plan for her 5th birthday. She’ll be young enough to enjoy it and old enough to remember.  Plus, it’ll be right before she starts big girl school…”


With that, the Disney 5th birthday plans began.  We knew our families would want to witness munchface's dream of Disney come true so, in August 2010, shortly after her fabulous 4th birthday party, we shared our plans to travel to Florida with immediate family.  It was also at this time that we decided TO KEEP IT A SECRET FROM MUNCHFACE.  Let’s just say, 1 year of planning a vacation for 8 people without spilling the beans to the tiny ears in the room was next to impossible - Mission Mickey Impossible to be exact!  Well, mouseketeers, here we are, less than 1 month away and she has no idea!
As the President/owner/only occupant (aside from you visitors), I dedicate this blog posting to keeping secrets in the name of *SURPRISE!* partially because I’m no good with surprises. I can shake a gift box and tell you the color, make and model of the item enclosed… I’m like Super Surprise Plans Smasher – LOL. I am virtually impossible to surprise but I do, however, enjoy surprising others and my munchface is NO exception.
We can’t discuss the big deal 5th birthday plans with her so, as she does every year, munchface started to plan her birthday in like November 2010 (her birthday is in August BTW) and GUESS WHAT SHE ASKED FOR? A MINNIE MOUSE party! How perfect (thankya, my God of favor and perfect planning goodness)!


We’re having a small (and I do mean small) birthday party where we will announce the big news. 
Theme? Minnie Mouse BOWtique
Colors? Red, Black, White, Yellow (the traditional Minnie colors)
Cool Ideas? Of course, you’ll have to surprised BUT some of them are below:
  1. Zion’s Bowtique - A hair bow buffet (of mommy and Munchface-made fab creations) with custom “shopping bags”
  2. Bow Holder crafts - each girl will decorate her very own fabulous bow holder :)
  3. Poms of all kinds - Ribbon, Tissue paper, Flower
  4. Pin the Bow on Minnie game - I have GOT to paint this one!
  5. Many, many more
Here’s my inspiration board:


Munchface has actively helped to make her little Minnie party fabulous and constantly talks about how much fun she's going to have. We just can't wait to get her Disney reaction on video; moments like this are PrIcEleSS!

Bear with me... I know this is the longest post *like* ever but I feel like I've spent this Summer coping with the bittersweet fact that my little, itty bitty, character is growing up...  We've tried to foster an environment of mental, physical, emotional and creative growth for our delicate munchface flower... Honestly, though, all the while, I'm kicking myself for not holding her like a baby just a little longer.  Goodness, I'm about to cry at the THOUGHT of my 6 lbs 8 oz baby going to Kindergarten... with a backpack... and pencils... I can't imagine the snotty mess that I'll be when she gets on the bus. UGH, someone send me the recipe for the stop-your-baby-from-growing cupcake! I need a double dose. 

Well, just one more flashback... Halloween 2009 when my little big girl was SO excited to wear the minnie high heels daddy picked up for her Halloween costume.  Look at that smile, I just want to kiss her to pieces!


Photobucket

Friday, July 1, 2011

BOW-DACIOUS

WELCOME BACK ME! YAY! I'm finally making time to update my e-world (go me*go me*go me).


I have embraced my inner Real Housewife of NJ and started to create fabulous little bows for munchface. I mean, something about oversized, chunky, grosgrain bows just make my soul happy...  This is the first of MANY tutorials geared toward other mamas just like me who have a thing for bows, headbands and any other hair decorations for little (and not so little) ladies :)


Finished product will look like this:


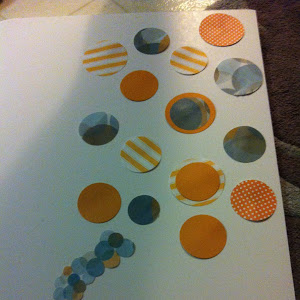
Step 1: Take a paper cup, flip it upside down and trace 5 circles.  Flip over and trace 4 circles with the smaller base of the cup.

 You will have a total of 9 circles (5 larger; 4 smaller) as pictued below:


Step 2: With a piece of felt, trace the base of a cup. This will serve as the base of your bow.


Step 3: Take one of your large circles and dab the center with hot glue.  Fold in half and hold for about 10 seconds.  It should look like this:


Step 4: Place hot glue on one side of the semi circle (pictured below):

Again, hold in place for a few to allow the glue to set (demonstrated below):


Top view: 


Step 5: Dab the back side (as pictured below:


Step 6: Place the "point" on the felt bow base like so:


Repeat with 3 more circles.  The 4 should cover the felt bow base.  Take the 5th and repeat Steps 1-4.  Place glue on the point, then place in the center.  This piece will give the dome shape so do not glue anywhere other than the point.  It will look like this:


Step 7: I like to glue the pieces together so the felt is no longer visible and it makes it a little more sturdy.  It will look like this:


Step 8: glue the headband to the felt base:


Step 9: cut a small square of felt to reinforce the bottom of the bow:


Step 10: Glue the 4 smaller fabric circles to their base and, instead of the center piece of fabric, embellish with a gem (or random lost/broken earring).  It will look similar to this:


LOVE!  It adds that extra something to every outfit AND you can adhere these to ANYTHING! I've made a bib necklace, sewn them to purses, made a double sided version as a keychain... the possibilities are endless! HAVE AT IT!


Photobucket


Wednesday, June 15, 2011

Blurry Days


It's been WAY too long since I last posted.  I think my glue gun has either forgotten my name or packed up and LEFT me... *singing* "BABY, COME BACK... YOU CAN PUT IT ALL ON ME!"


I must craft or bake or build or make or decorate or paint or SOMETHING and SOON!


So, yes, I've been busy and YES, I've neglected you but please promise, beloved blog, that you too haven't packed up and left me... Promise you'll be here when I come up for air... Let me put this into perspective: hubs bought my dream mixer for Mother's Day (ah, he knows me SO well :) to make my baking life easier (and more fabulous)!  Please note: He doesn't wrap gifts very well and used the Lala Loopsy to "present" the gift to me - haha.  So he. and. I.


Isn't she (the mixer, silly) lovely? Wouldn't she inspire you to bake and bake pretty? I know! I am mad at myself for not using her yet... Well, there HAS been a lot of things going on here lately.  Some of which include:

  •  We drove to Savannah, for my sweet cousin Nia's baby shower, where I was asked to provide a DIVA centerpiece with the colors black, white, and HOT pink.  Enter zebra-print duct tape, feather boas and pink daisies to create THIS topiary for the tables
  •  Southern Charm Tea Party - a fabulous event I hosted for my dear friend's bridal shower. The event was jam-packed with DIY details and requires a separate post but below is a little teaser of me and the bride-to-be:
 
  • Legends of Hip Hop Concert - an awesome concert featuring Dougie Fresh, Slick Rick, and Chubb Rock.  Little ol' me was asked to provide VIP decor and floral arrangements... One of the centerpiece options are poorly cell phone captured below:
  • Bows/Headbands - With summer comes new clothes and summer bows... Let's just say, we've been BOW-tastic around these parts... I owe some tutorials and they are def forthcoming, pink-ay promise, mmK?! Check out the bows munchface wore to the Vintage Wine Festival (where they have AWESOME activities for children ALLLL DAY), 2 thumbs up!

  • Hubby's Spa Day Birthday - Let's just say, he enjoyed himself; the pic speaks for itself:


  • Of course we've had playdates -  our sister/cousin Chazzy came by for a tea party playdate and, after make-up and dress-up, they baked their own mini pizzas and I was requested to be the restaurant waitress... I tell ya, never grow up, little ladies, NEVER:


I'm no longer busy, I'm blurry... I don't know how things get done anymore, my days just blur on by sometimes.  I just thank God for freezing a few seconds each day to allow me to check things off of my to-do list. I know, I fully EXPLOIT my "in" with the author of time to complete my to-do list every.single.day.  I thank Him for mercy and safety during my travels during late hours and all over the DMV.  I am confident He will provide more time to stop, bake and create soon... So, yes, I've been M.I.A. and I've been busy but trust me, specific updates are coming in the VERY near future for my sanity's sake!


Ta-ta for today!

Photobucket

Tuesday, April 12, 2011

PINKALICIOUS Party

Pink. Pink. Pink!!
If you haven't had the pleasure of reading the popular Pinkalicious series, you are truly missing out.  After reading it for the first time with Zion, I couldn't help but envision a fabulous party for little girls.  Think about it, cupcakes?? Pink-ititus? Green food cure? It's everything girly and was quickly added to my "Must Host" list.

IDK if I've told you but Zion won some Valentine's photoshoot with an up-and-coming local photographer (I hired her to photograph Zion's Candy Land birthday party but anyways...).  She mentioned that she wanted to host a party for her daughter's birthday and asked my recommendations for a theme. Could it be? Was this my opportunity to finally host a Pinkalicious party?  Familiar with the story, we immediately got to work planning...

1.  The Candy Buffet - My apothecary jars were filled with all kinds of candy (found for a bargain after Valentine's Day). Behind the buffet, we created a wall of "ruffle streamers" and used my Cricut to cut the letters from glitter cardstock. It turned out beautiful! Check it out:


 2. I made polymer clay cupcake rings for each guest.  The clay is so easy to work with that i can't wait to incorporate it into munchface's minnie mouse party as well :) 


 3. I made headbands for each girl.  The headbands were on clearance after V-Day (originally 3/$1 on sale 3/$.50)... They were so cute and I'm sure the girls will have lots of use left in them :) 

4. Wafer Girls - Dipped in candy melts for hair with edible marker drawn faces... I absolutely LOVE how they turned out... SO CUTE!


5. Games/Activities. I really wanted the themes of the book to translate into activities. Of course there was a moonbounce for the girls to play in while we awaited guest arrivals and once all activities were done (they needed to bounce off some of that sugar). The party started with Grandma reading the story while the girls ate their bagged lunches.  After the story, girls decorated their own Pinkerella tiaras with cupcake stickers and wands.  On their way upstairs, each girl was blindfolded for Pin the Cherry on the Cupcake (mommy painted it for the girls).  Once everyone was upstairs, we re-enacted the story's park scene where she blends in with the peonies and butterflies.  I turned on the Yo Gabba Gabba "Happy Birthday" song and the girls had a blast giggling and twirling in the tissue paper cut outs.  I had the girls get in a semi-circle while mom lit the cake candles and placed it in the center; it made for an awesome photo op. Check out some photos:
Gramma reading the book.
Decorating tiaras. I got the crayon "cupcake wrapper" in a post-Valentine's Day sale for $.10!!
Pin the Cherry on the Cupcake


I can almost HEAR the giggles!

The BEST moment of the party!


Gramma-made Cake
  
The smile only a Pinkalicious Party could bring :)


I'm linking to the following websites (first time and I'm feeling fancy)!
Tip Junkie handmade projects


Today's Creative Blog
Photobucket


Life Update - Divorce.

In my last post, I mentioned it's been 6 years since I last blogged and this particular life update is one of the reasons I buried my he...

© Shipwrecked on Fabulous Island. Made with love by The Dutch Lady Designs.