Thursday, March 22, 2012

Elmo's World: Photo Backdrop

Have you ever seen Elmo's World? It's basically a preschooler's scribble-y (it's a word, trust me?) rendition of a house. 

For parties, I ALWAYS take loads of pics... I am *totally* that mom.  You know, "look at me *click*...say cheese*click*... OK, WAIT. Do that again!*click*... O wow *click* I gotcha!"

I started to incorporate photo props into events as another means to bring home the theme and document the who's-and-what's of the party!

So, here's another quick tutorial...

Elmo's World Backdrop

1. Gather supplies
- 1 white flat bed sheet (thrift store purchase)
- Finger paints (because they're cheap and washable)
- Paper plates (to hold the paint)

- Sponge brushes

2. Lay your sheet out on a hard surface (because it's easier to clean if color bleeds through)

3. Place each color on a separate plate

4. Paint the squiggle paint border at the top of the sheet.

5.  Use blue to frame a window and red to draw the curtains

6. Paint his Dorothy painting (a goldfish with water).

7.  Use crayons to create the pink scribbles.

8.  To hang, use the Command strips and adhere to the wall.  I used 4 across the top and it lasted the entire party..

9. Snap your pics!!

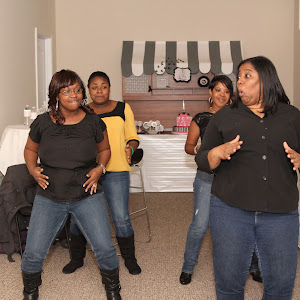
After the dance contest and free-for-all, I gathered the kiddos for group photos.

Smiling:


 Silly-ing (another word, I guess?):

Dancing:


Mean Mugging:


Sister-Cousins:


::

The backdrop was an awesome addition to the party.  Hung on the wall behind the scribble table, it made a statement as guests arrived, provided the perfect background for the dance competition and allowed for EVERY guest to have their photo taken in Elmo's World fashion!

Mission accomplished if you ask me :)


Photobucket

Linking Up:

Somewhat Simple

52 Mantels
 
shabby creek cottage

Wednesday, March 21, 2012

Elmo's World: Crayon Craft #2

Hi-hi!  I'm bringing another quick tutorial from the Elmo party...

Buffet Labels

1. Gather Supplies:
- Clothespins (Walmart)
- Crayons (Dollar Tree)
- Hot glue sticks/gun

2.  Glue down the seam of the crayon paper

3. Place crayon on the clothespin 2 things to note:

 - the crayon point should be closest to the "clippie" part of the clothespin
- the crayon base should be sit on the tabletop; it will prevent the pin from tipping over

4. Repeat steps 2 and 3 for the other side of the clothespin

5. Enjoy!


Stop at step 3 (i.e. don't double-side with crayons) and use these beauties to create a birthday photo display of your little one throughout the year (maybe a banner or a clothesline-style display of Elmo clothing for a baby shower??).  Wouldn't this also make a CUTE addition to a homework/craft area as a means to display artwork?

I LOVE making useful party decor that can have a life post-party!

ENJOY!

Photobucket

linking up:


Tuesday, March 20, 2012

Elmo's World: Crayon Craft #1

As I stated yesterday, Nina's World was a success! We nailed the decor by staying true to the theme AND used Elmo's favorite things: CRAYONS!

The success of events is found in the attention to detail!

Today, I've got a tutorial that has a number of uses. 

$3 Centerpieces


1. Gather supplies:
- crayons (Dollar Tree 64 box)
- plant pot (Dollar Tree)
- hot glue/gun


2.  Glue your crayons around the pot in an upright position (the pots pictured required 35 crayons each)

4.  Enjoy the fabulous centerpiece vase you created for $3 (or less)

I added some scribbles (in TRUE Elmo form) around the brim and I really love how they turned out.  They were perfect to hold the crayons on the party's scribble table!


 In addition to affordable party decor, imagine one in your craft space to hold paper clips or fabric scraps. Add a pot to your homework area for your child to quickly find contents.  How adorable would they be on an art station or in your classroom?  Don't you just love to find new ways to make organization practical and pretty :)

Plus, they were so... Easy, right?


Linking Up:
Tip Junkie handmade projects


blah2beautiful


Photobucket

Monday, March 19, 2012

Mama-Made Monday: Weekend in Review 2

Am I the only one who feels like there's an unspoken race against the clock? I couldn't FIND my seconds and minutes this weekend... Today, however, I'll TAKE a moment to unwind... hopefully.

Friday, Munchface was excited to take her leprechaun trap to school and to wear the little shamrock bow I made... As I said here, I'm trying to be better about accepting the imperfections in my projects.  With my new motto in mind, I didn't make another version when it didn't turn out EXACTLY as I'd planned.  Instead, however, I used it to embellish a basic bow

She loved it!

Munchface was also excited to take her classroom treats to school! I ordered fabulous little tags from here.  I purchased a 3/pack of green curling ribbon:


 ...and Million Dollar Mints (both from the Dollar Tree):


 I just filled some clear goodie bags we had on hand (sold in the Walmart bakery supplies) to create the quick treats for her class.  Note: I removed the staple from the ribbon clusters (it saves SO much time) and used the ready-made curlies to tie the bag.  Also, I didn't hole punch the tags, I just glued them to the bag (shh, I don't think the 5 yr olds even cared...or noticed).


Friday night, we had a family playdate with the Nunns.  I just love the time with family-friends (you know, those who can come over when your house isn't "ready" for company). 

I also LOVE to kiss on my not-so baby Mariah when we get together. Isn't she just yummy?


Saturday, we woke up to a great breakfast of shrimp, grits, turkey bacon and apple slices. Hubbs prepared a fabulous spread!
...I hope you didn't expect pics... I ate it too fast to document, lol.

O, I also started my day with random gifts from Uncle Darren:


After breakfast (that I didn't have to cook) and the awesome perfume (that I didn't have to buy), I felt like I could conquer the world (OR the mad house at the mall)!

It was off to the Dr. Seuss event... There were crafts, snacks, story time, soft play area fun, the Cat in the Hat and even a parade! We had a blast!


The life of 2 busy girls meant they were on a tight schedule and had to leave earlier than planned for a birthday party.  The girls were so excited for new bears they made us promise to go "pick them up" on their behalf.  Excited for what bears you ask? The $10 St. Patrick's Day Build-A-Bears, of course!  The mommies had our orders ("just the bears, no clothes and no shoes; we will get those later, mommy") and we were on our way:


We spent the rest of the day shopping, indulging in mall food and preparing for the Elmo party that was on Sunday!

Sunday was busy! Starting with service... I had to sing in the choir that morning and it was an amazing time in the Lord!  If you didn't go to church, let me give you a dose for your week:

Zechariah 3:1-8.  Go read it!  A few things to note:

- God saw Joshua NOT for who he was but for who he was going to be. If only we could do the same in our daily life?

- Satan (replace with your adversary) pointed out the negative (like I do sometimes) but had to shut up once God reminded him that He saved Joshua.

- Joshua didn't have to change a thing.  God chose him. God changed him.  Salvation is not an act of one's own success!  I love knowing that I'm not a self-made success story; I screw too much up!

Seriously, I could go on but I just keep going back to these 3 points because they are lessons I KNOW I need to hammer into my mind and heart.

**

 SO, I left church, picked up our sister-cousins, went to Walmart for a few last minute items, ran to the house to get the cakes and cookies, then headed to Alexandria for the par-tay! 

::WhEw::

Can I just tell you Nina's World was a success!  The party will get its own week's worth of posts post so be sure to come back tomorrow for the first of many Elmo post!

How was your weekend? How did you celebrate St. Patrick's Day?

Photobucket

Life Update - Divorce.

In my last post, I mentioned it's been 6 years since I last blogged and this particular life update is one of the reasons I buried my he...

© Shipwrecked on Fabulous Island. Made with love by The Dutch Lady Designs.