What better way to end the work week than with FOOD AND FUN, Islanders?
Without further delay, allow me to introduce the dessert table:

Here it is during set-up:

Aren't those ruffles fabulous? Amazing? Perfect? How'd I do it? If you follow me on Twitter or Instagram (and you totally should), you probably saw that I ordered Munch's bed skirt for $25 from Wayfair... After searching for a ruffle table skirt, I quickly realized it would cost me no less than $100 for the quality table skirt I envisioned... Then a light bulb went off and I decided the bed skirt would be perfect (ruffles cascading on the sides and flat on the table surface? Too perfect). I used wrapping paper to protect the bed skirt's surface:


I think it turned out perfect:

The cake!

You can see the bunny tail yarn on the window in the background of the above photo(I covered all the windows in the same fashion). For the cake's design, I wanted ruffles with colors from white to dark pink... Something girly, frilly, fabulous and unexpected all at once. Misty, the owner of Girl Meets Cake, did an amazing job! I absolutely LOVE the end result!

Thanks, Misty!
The Cupcakes.
I ordered 2 dozen lemon cupcakes (pink) and 2 dozen chocolate cupcakes (turquoise), Chef Joy did an awesome job! I communicated the same concept as the cake (in shades pink and turquoise) and also sent the picture from my inspiration post so she could create the other designs I fell in love with. I thought I wanted all of them to have the same design until she sent this picture with my two ruffle options to choose from:

Who could choose just one?! Luckily, we had enough cupcakes to have multiple designs. They were delicious:


My co-worker's wife owns a local in-home bakery. I tried her red velvet cupcakes and knew we HAD to have them at our party... They were the crowd favorite and didn't last long at all. Great job, Gabie!

Like the toppers? Check out the tutorial here.
Cake Pops.
I was so excited when the local baker, Custom Cake Pops, offered a Groupon. I snagged 2 orders (1 for baby shower and 1 for Munch's birthday party) for next to nothing.
During my lunch break, I met the fabulous owner, Ashley, when she delivered my cake pops. She was so cute and sweet:

Thanks, Ashley!
Before the shower, I used some scrap ribbon, little bows and stickers to make the already fabulous pops even MORE fabulous:


Cookies.
With my cake pops in hand, I headed to Chef Joy's for the cakes and cupcakes. She had very strict instructions for traveling with her beauties in the heat:

When I saw the goodies, I completely understood why she wanted them to remain perfect! Here they are on display:

Yes, God baby's name is on the onesie cookies... I just love them. Like. LOTS.

Add the cookie assortment and you've got enough sweets to feed the attendees!
Of course, we had real food too!

The Menu.
My mouth was watering when my sweet daddy sent me these pics:


Yes, dad made curry lamb/chicken and egg rolls! Partner that with jasmine rice, fried party wings, mac-n-cheese, green beans, meatballs, chips-n-dip, fruit and more; WE WERE EATING REALLY WELL!

The Games.
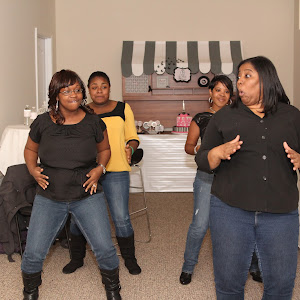
Dancing Dilemma. Mom has to go out for a night on the town and requires a belly-appropriate dance. Once divided into teams, the groups took the "stage."
First, because this was an icebreaker, they had to introduce themselves individually and then as a group with their team name. Up first? Team 1... As in First Place:


Followed by the Shhh Girls (all of their names started with the shhh sound):

They performed the belly bump:

Team #3, BMD (B.aby M.ama D.rama), performed the belly rub in the club:

Team #4, The Baby Droppers had a Beyonce entrance and got down like it was the last 24 hours before baby would come, lol!

Daddy-to-be (D2B) chose Team Baby Droppers as the winners. The game, however, had a catch. The decision-maker had to perform with the winners.
Yes, that meant D2B had to Beyonce walk on to the stage with the girls and let his belly catch the groove... Here he is doing JUST that (those facials are hilarious).

As you can see, Mommy-to-be (M2B) was enjoying the yummy food and let daddy get his dance on while she enjoyed the yumminess :)
Daddy Designs. We've all seen a little girl with her dad and thought, "awww, he must've {tried} to get her dressed or to comb her hair." We gave the guys an opportunity to design a onesie for baby. I had Chef Joy bake 1 dozen plain onesie sugar cookies. I gave the guys sprinkles and icing to (in my Tim Gunn voice) "make it work." When time was up, we turned on the music and they gave a fashion show of their designs. From the picture below, you will see one of the them took a pretty pre-decorated cookie from the dessert buffet and added a few sprinkles - CHEATER, lol.

The Newly Dad Game, was structured like the Newlywed game. I asked 10 questions about M2B's pregnancy. When it was time to review the answers, I asked the question, let the audience blurt out responses, gave D2B a chance to answer then let M2B give the RIGHT answer.
We had a cute moment when I asked what D2B loved most about the pregnancy. He responded, "that I have the prettiest pregnant woman ever." M2B confirmed with a simple response, "I said me..."
Awwwww!
At the end of the game, everyone tallied up their scores and guess who won fair and square?

He was so proud of himself that he held up his card in celebration:)
After games, we cut the cake, opened gifts, headed outside for a group shot then played in the photobooth. Everyone gobbled up their second (...and third) plate while enjoying time with each other.

Do you see D2B put a pacifier in his mouth? As you can imagine, with him and 2 little girls, mommy has her hands full.
Luckily, I'll help hold God baby anytime!
I hope you have a weekend full o' fun!
linking up: